
From < 0.21.0
File Permissions For Config/Data
Section titled “File Permissions For Config/Data”The previous docker image used a Linuxserver.io base image that used PUID/PGID environment variables to set the user to use for file permissions in the container.
The new docker image is based on a hardened, distroless image that does not have these variables and defaults to a different non-root user 65532:65532. If you had previously set PUID and PGID you can still use this user setup with a slightly modified setup.
In any scenario, follow the directions below:
1. Remove PUID/PGID
Section titled “1. Remove PUID/PGID”If you had set PUID and PGID, write the values down somewhere and then remove them from your docker compose stack now.
services: multi-scrobbler: # ... environment: - PUID=1000 - PGID=1001 # ... volumes: # ...2. Fix Permissions and Set user
Section titled “2. Fix Permissions and Set user”Use the tabs below to pick how you run docker and mount directories into the multi-scrobbler container.
Each tab will tell you how to migrate MS-related volume permissions (like /config and the optional /data directory) and set a user to use for ownership with the new image. Not every scenario needs permission or user changes.
You use a Linux OS on the physical machine/VM. Docker runs on this machine. (This includes LXC containers.)
You used PUID/PGID environmental variables and host-mounted directories for volumes.
Replace PUID/PGID with user, using the same values:
services: multi-scrobbler: # ... user: 1000:1001 # PUID:PGID environment: # ... volumes: - /my/host/dir/msConfig:/config # ...You did not use PUID/PGID environmental variables but have host-mounted directories for volumes.
1. Stop Multi-Scrobbler
Stop the multi-scrobbler container
2. Get UID and GID
Run these commands from a shell to get your UID and GID
$ id -u1000$ id -g10013. Change Directory Permissions
Make yourself the owner of each directory mounted into multi-scrobbler:
sudo chown -R 1000:1001 /my/host/dir/msConfig 4. Set user
Then set user to your UID and GID:
You use named volumes for multi-scrobbler directories
Example
services:  multi-scrobbler:    # ...    volumes:      - ms-config:/config    # ...
volumes:  ms-config:
With PUID/PGID
If you are using Named Volumes and also had PUID/PGID set you only need to set user in the compose file to use these same values as PUID:PGID.
See the Linux Host -> Bind Mount with PUID/PGID instructions for how to do this.
1. Stop Multi-Scrobbler
Stop the multi-scrobbler container
2. Find Named Volume Name
The actual volume’s name is usually a combination of the project’s name and the volume name like multi-scrobbler_ms-config. Use docker volume ls to find it from the list:
$ docker volume lsDRIVER VOLUME NAMElocal somethingFoo... ...local multi-scrobbler_ms-config3. Change Volume Permissions
For each named volume used by multi-scrobbler, run the busybox image with your named volume mounted and chown the entire folder to the default user of the new image:
- 1.You do not need to use
user: UID:GIDon the container if using the default values shown here. If you do decide to useusermake sure to replace65532:65532in this command with theUID:GIDset foruseron the container.
You use a Windows OS on the physical machine/VM. Docker runs with Docker Desktop or inside WSL.
You have host-mounted directories for volumes and your compose stack/directories are outside WSL in a regular Windows folder, like C:\Users\you\multi-scrobbler\config
Example
No other action should be needed.
You have host-mounted directories for volumes and your compose stack/directories are inside WSL, like ~/multi-scrobbler/config or \\wsl$\...
Example
services: multi-scrobbler: # ... volumes: - /home/you/multi-scrobbler/config:/config # ...1. Stop Multi-Scrobbler
Stop the multi-scrobbler container
2. Get UID and GID
Run these commands from a shell inside WSL to get your UID and GID
$ id -u1000$ id -g10013. Change Directory Permissions
In your WSL terminal, make yourself the owner of each directory mounted into multi-scrobbler:
sudo chown -R 1000:1001 /home/you/multi-scrobbler/config 4. Set user
Then set user to your WSL UID and GID (from id -u and id -g, usually 1000):
You use named volumes for multi-scrobbler directories
Example
services:  multi-scrobbler:    # ...    volumes:      - ms-config:/config    # ...
volumes:  ms-config:
With PUID/PGID
If you are using Named Volumes and also had PUID/PGID set you only need to set user in the compose file to use these same values as PUID:PGID.
See the Linux Host -> Bind Mount with PUID/PGID instructions for how to do this.
1. Stop Multi-Scrobbler
Stop the multi-scrobbler container
2. Find Named Volume Name
The actual volume’s name is usually a combination of the project’s name and the volume name like multi-scrobbler_ms-config. Use docker volume ls to find it from the list:
$ docker volume lsDRIVER VOLUME NAMElocal somethingFoo... ...local multi-scrobbler_ms-config3. Change Volume Permissions
For each named volume used by multi-scrobbler, run the busybox image with your named volume mounted and chown the entire folder to the default user of the new image:
- 1.You do not need to use
user: UID:GIDon the container if using the default values shown here. If you do decide to useusermake sure to replace65532:65532in this command with theUID:GIDset foruseron the container.
You use a MacOS on the physical machine/VM. Docker runs with Docker Desktop.
You have host-mounted directories for volumes.
No other action should be needed.
If MS exits with a /config is not writable error…
1. Stop Multi-Scrobbler
Stop the multi-scrobbler container
2. Get UID and GID
Run these commands from a shell to get your UID and GID
$ id -u501$ id -g20 3. Set user
Set user to your Mac UID and GID:
You use named volumes for multi-scrobbler directories
Example
services:  multi-scrobbler:    # ...    volumes:      - ms-config:/config    # ...
volumes:  ms-config:
With PUID/PGID
If you are using Named Volumes and also had PUID/PGID set you only need to set user in the compose file to use these same values as PUID:PGID.
See the Linux Host -> Bind Mount with PUID/PGID instructions for how to do this.
1. Stop Multi-Scrobbler
Stop the multi-scrobbler container
2. Find Named Volume Name
The actual volume’s name is usually a combination of the project’s name and the volume name like multi-scrobbler_ms-config. Use docker volume ls to find it from the list:
$ docker volume lsDRIVER VOLUME NAMElocal somethingFoo... ...local multi-scrobbler_ms-config3. Change Volume Permissions
For each named volume used by multi-scrobbler, run the busybox image with your named volume mounted and chown the entire folder to the default user of the new image:
- 1.You do not need to use
user: UID:GIDon the container if using the default values shown here. If you do decide to useusermake sure to replace65532:65532in this command with theUID:GIDset foruseron the container.
Authentication Setup
Section titled “Authentication Setup”The upgrade to add Auth for existing users has been designed to be almost painless.
When you upgrade, your MS instance will continue to work exactly as it does today for backend, Sources, Clients, polling, etc…the only thing that changes is how the web dashboard is initially accessed.
Additionally, nothing changes for your Ingress Sources like Listenbrainz Endpoint even after setting up auth. Any external clients that use these Sources will continue to work as-is.
How To Setup Auth
Section titled “How To Setup Auth”1. Upgrade to 0.21.0
Section titled “1. Upgrade to 0.21.0”If you haven’t already done so, upgrade to 0.21.0 and re-deploy your instance.
When you instance is re-deployed it will be in insecure mode. In this mode the dashboard and web API endpoints (but not Ingress Source-related endpoints) will either be:
- full read/write - you can use the dashboard/apis in the same way you did before upgrading
- read-only mode - you can access the dashboard/apis to view data but you cannot write to MS (cannot requeue, edit plays, restart sources, etc…)
This is based on how you access the dashboard.
2. Navigate to the Dashboard
Section titled “2. Navigate to the Dashboard”Navigate to the dashboard with the same URL you normally use IE
On the landing page you will see a warning banner asking you to set a password.
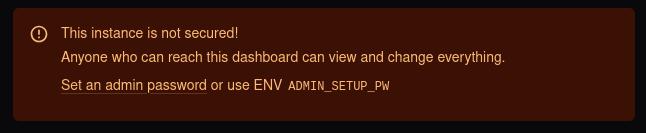
Click the password setup link here to navigate to /setup.
3. Secure Your Instance
Section titled “3. Secure Your Instance”On the /setup page you will be asked to set (and confirm) a password. You may also be asked to provide a Setup Token.
Your setup page does not ask for a Setup Token
Set (and confirm) your password and click Set Password.
You are now done and your instance is secured 🎉
Your setup page asks for a Setup Token
This occurs if:
- you have explicitly set ENV
AUTH_SETUP_TOKENor - you are accessing the dashboard from a potentially untrusted network
In either case, you can find the Setup Token by looking in your console or docker logs. The setup token will not be displayed in the logs streamed to the dashboard.
Look for Setup token in your logs, the token will be printed on the same line.
It is printed at startup and also the first time an incorrect token is used for setup. So, if you can’t find the token from startup just use anything for Setup Token, try to Set Password, and watch for the token to be printed in logs.
Once you have the token, set (and confirm) your password, add the token, and click Set Password.
You are now done and your instance is secured 🎉
4. Secure Mode Usage
Section titled “4. Secure Mode Usage”After your instance is secured:
- your dashboard and web APIs (except for Ingress as mentioned earlier) will no longer be accessible by unauthenticated users.
- the dashboard and APIs will be in full read-write mode for any authenticated users
If you have external tools that use web APIs you can create API Keys that they can use to access authenticated routes.
5. Next Steps
Section titled “5. Next Steps”- Reference the Authentication docs for more configuration concerning trusted hosts, reverse proxy setup, restricting cookies, and more…
- Setup a Public Dashboard for unauthenticated users to view by navigating to Settings -> Public Dashboard
Unattended Auth Setup
Section titled “Unattended Auth Setup”You can use Auth ENVs to set auth username and password on startup, bypassing the need to visit the dashboard and complete the setup process above.
Re-deploy your MS instance with these ENVs:
AUTH_SETUP_PW- Admin password to use.AUTH_SETUP_USEROptional - Admin username to use. Defaults toadmin.- This can be changed from the Dashboard after securing your instance
Your instance is now secured 🎉 and you can go to Step 4 above.
The SETUP envs will be ignored on subsequent deploys/restarts but you should still remove them once they have been used.
Disabling Auth
Section titled “Disabling Auth”If you already have your own auth solution, such as a reverse proxy + authelia/authentik/keycloak, in front of Multi-Scrobbler you can continue to use this by putting MS in Bring Your Own Auth (BYOA) mode with the ENV AUTH_MODE=disabled.
This disables:
- authentication on all routes
- user sign-in, sessions, passwords, etc…
- API Keys
- Insecure banner warnings and auth setup
Essentially, this is as close to Multi-Scrobbler before 0.21.0 as possible.
Data Directory Usage
Section titled “Data Directory Usage”Standardized application directories for storing config, data, and log files separately were introduced in 0.15.0. However, many of the cache/auth flow files used by MS are still stored in the config directory.
In 0.21.0, MS now looks for these files in the data directory.
For non-docker users, and users who have explicitly set a Data directory, use one of the solutions below:
The non-config files are mainly cache and auth-flow related and do not prevent normal usage of MS.
If you decide not to do anything Multi-Scrobbler will still operate normally, however…
If you have any Sources/Clients that rely on auth flows, like Spotify Last.fm…, you will likely need to re-authenticate these once you deploy 0.21.0 because the Source/Client won’t be able to find the auth-flow credentials in their old location.
All non-config files need to be moved to the Data directory you have configured. This includes:
- all non
.jsonfiles, like those ending in.cache,.car, etc…- except
.json.examplefiles
- except
- all
.jsonfiles that are not a config file- See the example
configfolder in the repository for all config file names
- See the example
Your Data directory likely already includes an ms.db database file and database backups like .bak. You can decide to combine Config/Data dirs by moving all files in Data into the Config directory and then explicitly setting both environmental variables to the same directory.
(This is essentially what the default values for the docker image already do.)
CONFIG_DIR=./configDATA_DIR=./config